TL;DR – I replaced the removable trays with a french cleat system for more freedom in positioning trays and cup holders.
In Part 1 I explained how I made the original version of this table. The plans for the base table can be found on Ana-White.com. It’s a simple plan that doesn’t require anything fancy. You can cut everything with a hand saw if you want, or have Lowes do all the cuts for you. From there I added removable trays and a plexiglass panel/screen.
Well, after several years we noticed that we were not using the trays anymore. They stuck out too far (about a foot) for the liking of most. And since the DMs weren’t using the projector screen, it was now just a regular old table. How boring…

I was still committed to the idea of removable trays or cup holders, though. So I did some thinking on how I could make a “rail system” (ala. Geek Chic). AFAIK, Geek Chic’s rail system is a combination of T-slot routs and retractable clips (on the removable accessories). However, I don’t own a router and I’m not sure I want to take my wood-working “hobby” to that level. When you get a router you probably need more bits, and then a router table, and then oh-geez-where-did-all-my-money-go?
So I thought the next best thing would be to invert the idea. Instead of routing out slots, I could attach something to the outside edges. This is where the french cleats come in. French cleats are simple, allow for freedom in positioning and can support a good amount of weight. The main trick is making sure you cut at the right angle (usually 45 degrees) and that the item to be attached has enough support so that it won’t tip forward and come out of the cleat (this was my initial problem because I’m physics-challenged…which is totally a real thing…).
Anyway, here is a simple explanation on how to make them. Alternatively, you could probably buy this and these and attach to the sides of your table and trays. I used some strips of 1×3 that I already had lying around, but I think if I did it again I would use something thinner.

I’m imagining a tiny X-wing flying down this trench…
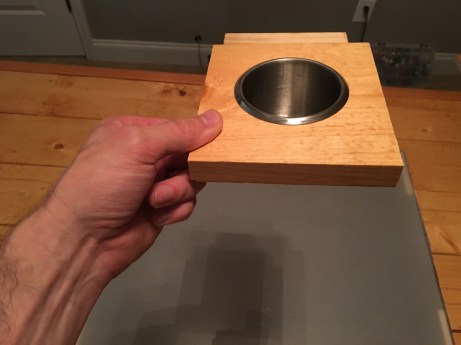
After attaching the cleats/rails along the length of the table edges, I then created my cup (dice?) holders. To begin with, I purchased a lot (as in a particular group of items, not the monster) of stainless steel, drop-in cup holders. I also had to invest in a hole saw and shank for my drill.
NOTE: Make sure you measure the diameter of the cup holder at the BOTTOM, not the TOP where the lip is (which is wider). I’m lazy and not-too-bright, so I didn’t measure properly and bought the wrong size hole saw. After a couple more trips to Lowes, I finally got the right one.
Next, I cut some 4.5″-5″ lengths of 1×6 (already stained from their previous use as trays), then drilled a hole in the center.
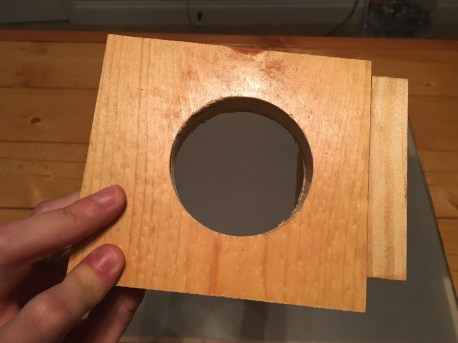
Wood but hole. Thank you, Dark Souls.
After drilling the holes I just dropped the cup-holders in. You can glue them in place if you like, but they work just fine without being permanently attached.
Now you need to attach the opposite french cleat to the back of the cup-holder wood. I used some wood clue to attach the opposite cut of 1×3 to the back because screws were likely to split the wood. If you’ve never used wood glue before, then know this: be liberal with it and use come clamps to hold things together while it dries. Wood glue is really strong, so it’s the safest solution for something small like this that’s not going to hold much weight.
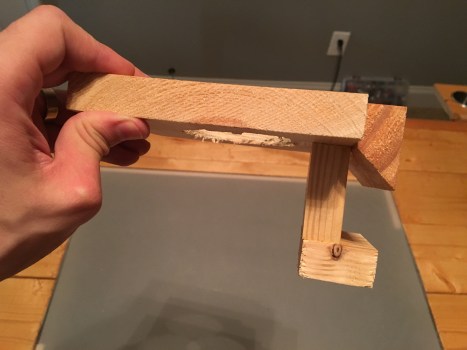
Crude, but functional.
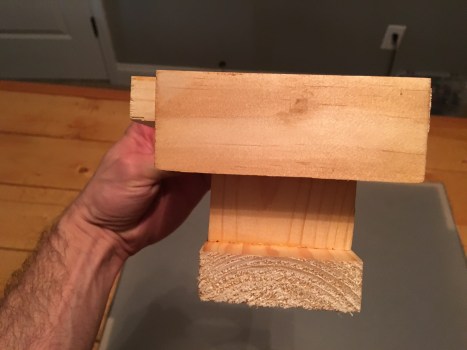
The opposite cut of 1×3 is on the top-right in the above picture. I attached this first. If you’re not a dumb-dumb like me, you’ll realize that due to physics (which is totally a thing), this would likely not hold anything without tipping forward. I had to create the brace (L-shaped pieces) to fit around the cleats on the table.
Try rear.
You can put all kinds of beer soda in this.
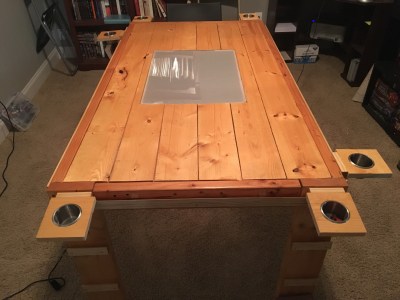
So there you go. That’s my table as it stands today. I have many ideas of what I want to do next and how I can do things better, in general. The biggest things I learned are:
- Measure at least 3 times for each cut.
- Use a Kreg Jig for pocket-hole screws.
- Remember that physics and gravity are real things.
- Be more patient and less lazy.
- Wood glue is my friend.
- Git gud.

Pingback: Dungeons and Tables Part 1 | gg no re